
O2 Image Optimizer Pro: Free WebP & AVIF Image Optimization Plugin for WordPress
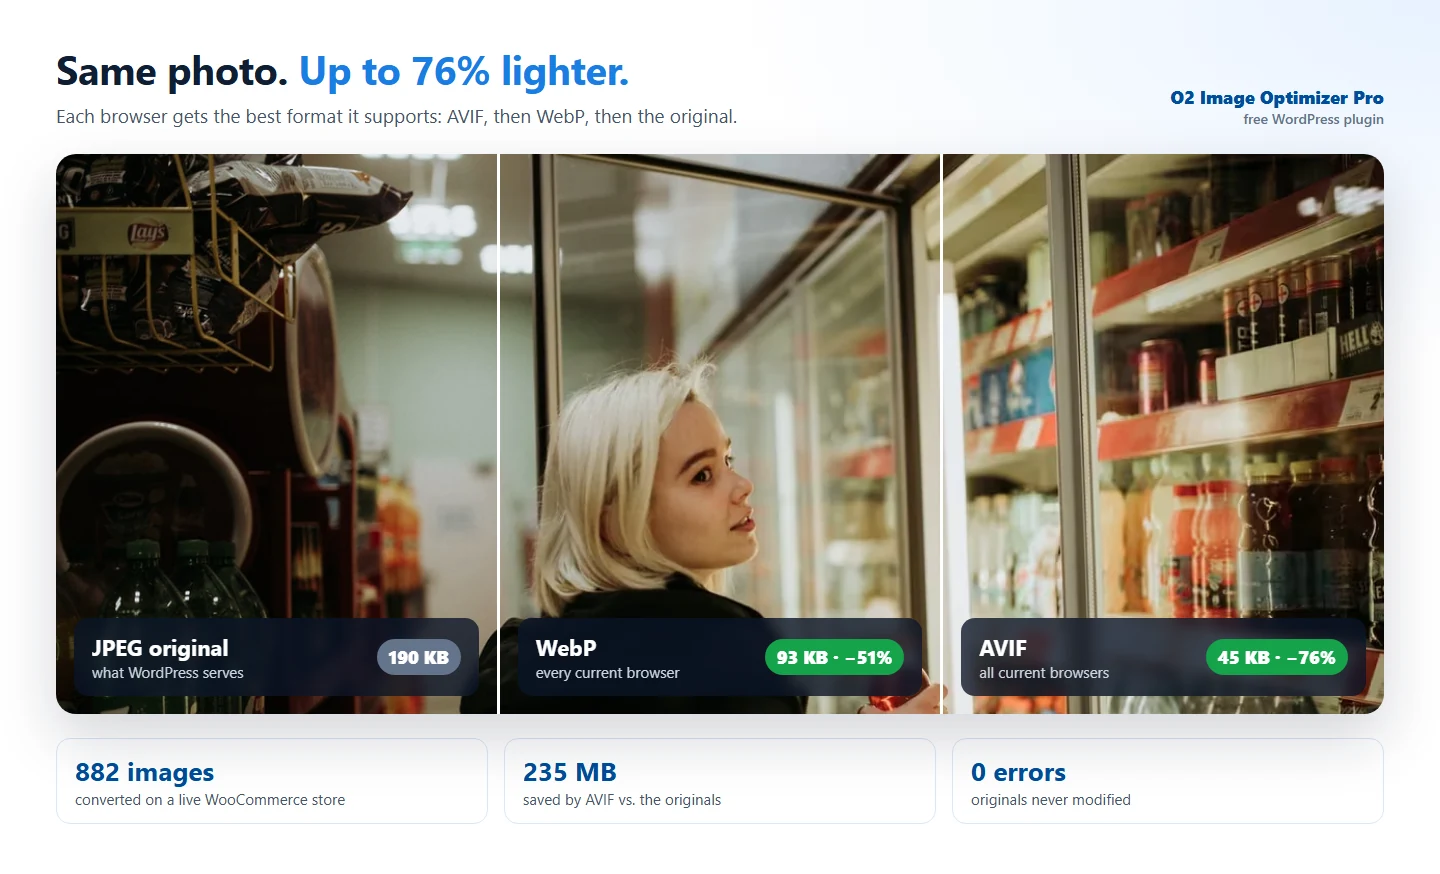
O2 Image Optimizer Pro is a free WordPress plugin that converts your JPEG and PNG images to AVIF and WebP on your own server and serves each visitor the smallest format their browser supports – AVIF first, then WebP, then the original – without touching your original files, without an account and without monthly limits.
- AVIF
- WebP
- <picture> delivery
- Apache / LiteSpeed rewrite
- Originals never modified
- Bulk conversion
- Automatic on upload
- WooCommerce ready
- WP-CLI
- Imagick or GD
- No API, no quotas
Why image optimization matters for your WordPress site
On most websites, images are the heaviest part of every page. A product photo or a blog header saved as JPEG easily weighs 200–800 KB, and a page carries dozens of them. That weight is what makes pages slow on mobile data, what pushes the Largest Contentful Paint of your Core Web Vitals into the red, and what Google PageSpeed Insights flags as “Serve images in next-gen formats”.
The modern formats fix this. WebP is typically 25–50% smaller than JPEG at the same visual quality and works in every current browser. AVIF goes further – often 50–75% smaller – and is supported by current Chrome, Edge, Firefox and Safari 16.4+. The difficulty is serving them safely: the few browsers that cannot read AVIF must still get something they can show, and your original files must stay intact.
Most optimization plugins solve that by sending your images to their cloud, charging per image or per month, and stopping when a quota runs out. O2 Image Optimizer Pro does the work on your own server with the Imagick or GD library PHP already has, so there is no account, no API key, no image limit and no third party receiving your files.
- Faster pages – lighter images load sooner, which improves LCP and the overall PageSpeed score.
- Better rankings and conversions – page experience is a Google ranking signal, and faster shops sell more.
- Less bandwidth and storage on the CDN – every visitor downloads less.
- Zero risk to your media – originals are never modified; deactivate the plugin and the site is exactly as before.
- No subscription – unlimited images, forever free, under the GPL.
How to install O2 Image Optimizer Pro
Installation takes about two minutes and needs no code. The plugin is a standard WordPress .zip package.
Step by step
- Download the plugin with any download button on this page. You get
o2-image-optimizer-pro-1.0.1.zip– do not unzip it. - In your WordPress dashboard go to Plugins → Add New Plugin → Upload Plugin.
- Click Choose File, select the zip and click Install Now.
- Click Activate Plugin. A new Image Optimizer item appears under Media.
- Open Media → Image Optimizer. Under Server support check that AVIF and/or WebP show Supported.
- Review the Settings tab – the defaults are good for most websites – and click Save Changes.
- Back on the Dashboard, click Convert images not converted yet and keep the window open until it says Optimisation finished.
- Open any page of your site, right-click an image and choose Open image in new tab: the address ends in
.avifor.webp.
Requirements: WordPress 6.2 or newer, PHP 7.4 or newer, and the Imagick extension or GD with WebP/AVIF support (GD writes AVIF from PHP 8.1). Most hosts already have them; the dashboard tells you exactly what your server supports.
Features: every module, what it does and how to set it up
O2 Image Optimizer Pro lives under Media → Image Optimizer, with four tabs: Dashboard, Settings, Tools and How it works. Below, each part is explained the same way: what it is, how it helps you, and how to set it up, with real screenshots from a live store.
01AVIF and WebP conversion that never touches your originals
What it is
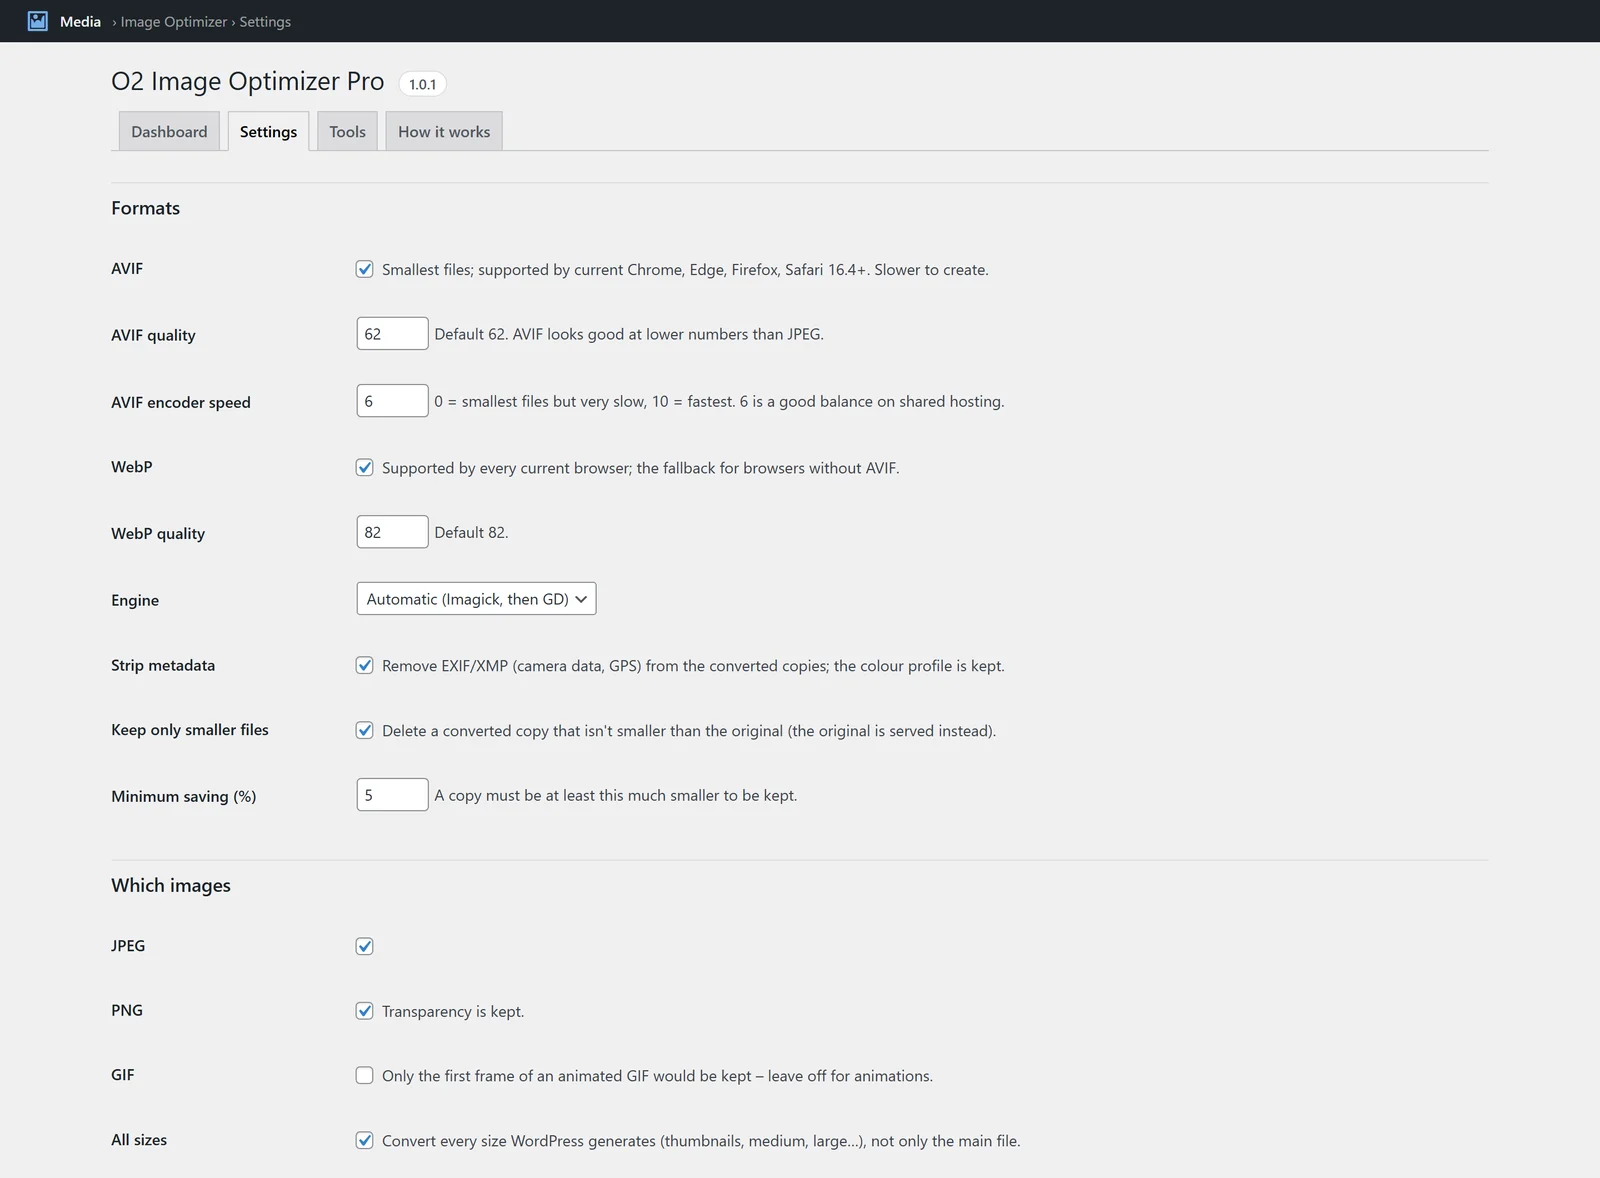
For every JPEG and PNG in your Media Library – and for every size WordPress generates from it (thumbnail, medium, large, WooCommerce sizes…) – the plugin writes an AVIF and a WebP copy right next to the original: photo.jpg gets photo.jpg.avif and photo.jpg.webp. Conversion uses Imagick when available (better AVIF control) and falls back to GD automatically. PNG transparency and the colour profile are kept; camera data and GPS location (EXIF/XMP) are stripped from the copies.
How it helps
You get the smallest file each format can produce, at a quality you choose, with no risk: the original stays byte-for-byte untouched. A copy that is not at least 5% smaller than the original is thrown away automatically, so a visitor is never served a heavier file. Files are written to a temporary name and swapped in atomically, so a half-written image is never served either.
How to set it up
- Go to Media → Image Optimizer → Settings.
- Under Formats keep both AVIF and WebP ticked. Defaults: AVIF quality 62, WebP quality 82 – a good balance between size and sharpness.
- Leave AVIF encoder speed at 6 on shared hosting; lower it for smaller files if your server has CPU to spare.
- Keep Strip metadata and Keep only smaller files ticked.
- Under Which images choose JPEG and PNG, and keep All sizes on. Leave GIF off if you use animated GIFs – only the first frame would be kept.
- Click Save Changes.
02Smart delivery: AVIF, then WebP, then the original
What it is
Converting is half the job; the other half is giving each browser a format it can display. By default the plugin wraps every image of the page – theme, blocks, page builders, WooCommerce galleries – in a <picture> element with an AVIF and a WebP source. The browser picks the first format it supports and falls back to the original <img>. Your srcset and sizes are carried over, so responsive images keep working.
How it helps
The <picture> method is decided by the browser itself, so it is safe behind any page cache and any CDN – Cloudflare, LiteSpeed, WP Rocket and others. The wrapper uses display:contents, so your layout and CSS do not change. On Apache or LiteSpeed you can also choose a server rewrite that keeps the .jpg URLs and serves AVIF/WebP based on the browser’s Accept header.
<picture class="o2io-picture">
  <source type="image/avif" srcset="/wp-content/uploads/photo.jpg.avif 1280w, /wp-content/uploads/photo-768x512.jpg.avif 768w" sizes="(max-width: 1280px) 100vw, 1280px">
  <source type="image/webp" srcset="/wp-content/uploads/photo.jpg.webp 1280w, /wp-content/uploads/photo-768x512.jpg.webp 768w" sizes="(max-width: 1280px) 100vw, 1280px">
  <img src="/wp-content/uploads/photo.jpg" srcset="..." alt="..." width="1280" height="853">
</picture>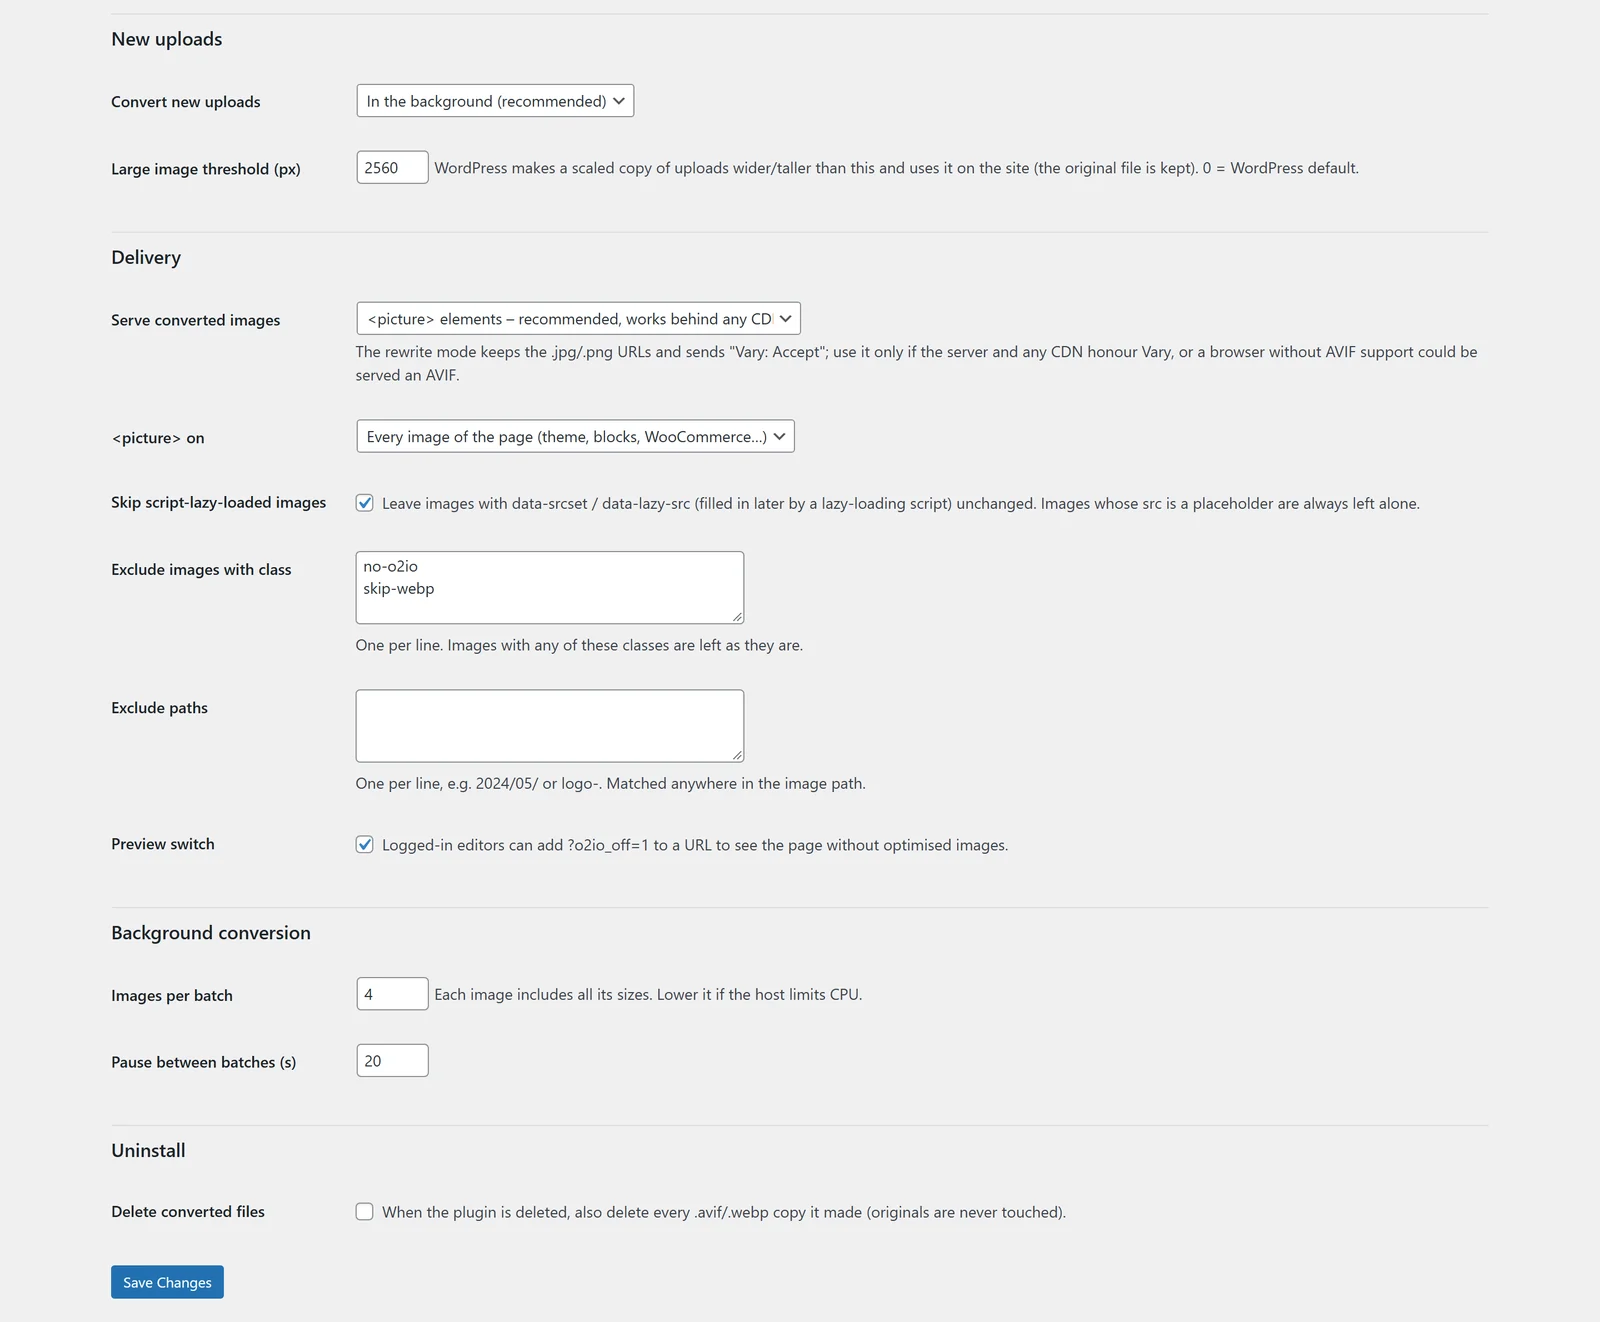
How to set it up
- Go to Settings → Delivery.
- Keep Serve converted images on <picture> elements (recommended). Choose Server rewrite only if your server and CDN honour
Vary: Accept. - Keep <picture> on set to Every image of the page, so theme and WooCommerce images are included, not only post content.
- Click Save Changes, then empty your page cache once so visitors get the new HTML.
- To compare, open any page while logged in and add
?o2io_off=1to the address: you see the page with the original images.
03Bulk conversion of the whole Media Library
What it is
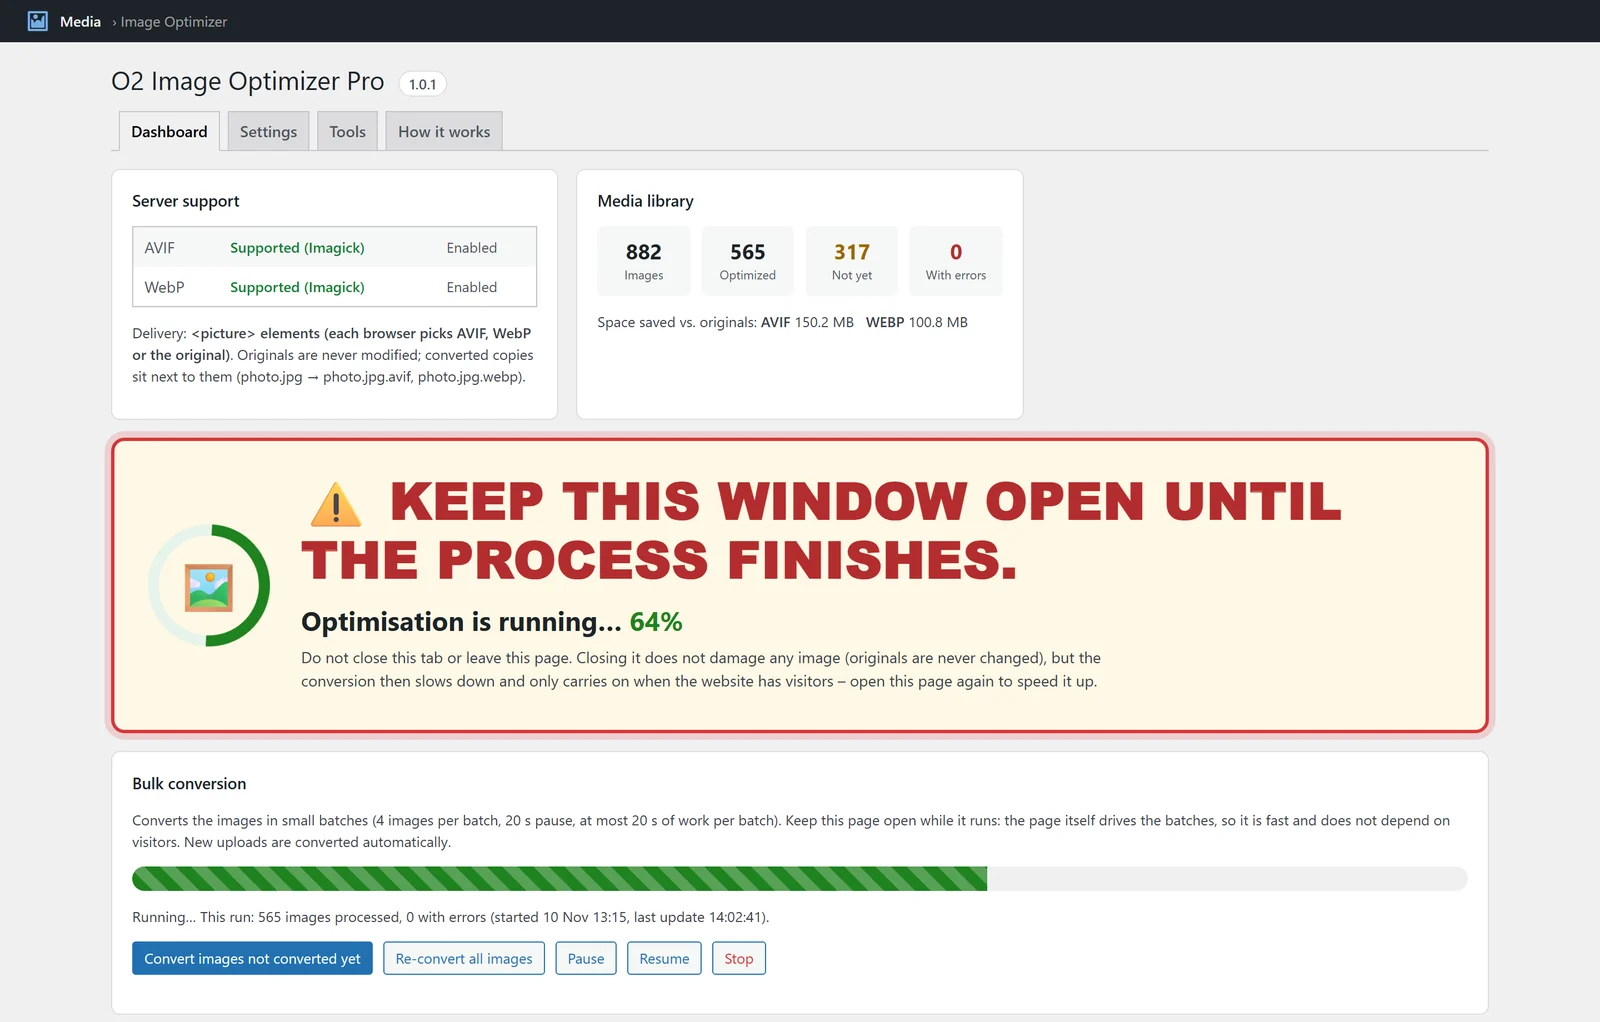
One button converts every image you already have. It works in small batches – 4 images per batch with a 20-second pause by default, never more than 20 seconds of work at a time – with a lock so two batches never overlap. A large progress panel shows the percentage, the tab title shows it too, and you can Pause, Resume or Stop at any moment.
How it helps
Shared hosting limits CPU, and a plugin that tries to convert a thousand images in one go gets stopped by the host. Small batches stay well under those limits. While the dashboard is open, the page itself drives the batches, so it runs fast and does not depend on visitors; if you close it, nothing breaks – the conversion carries on in the background through Action Scheduler (bundled with WooCommerce) or WP-Cron, only slower.
How to set it up
- Go to Media → Image Optimizer → Dashboard.
- Click Convert images not converted yet. Use Re-convert all images only after changing quality settings.
- Keep the window open until you see Optimisation finished. The browser warns you if you try to leave while it runs.
- If your host is strict about CPU, lower Images per batch under Settings → Background conversion.
04Automatic optimization of new uploads
What it is
Once the library is done, you never have to think about it again. Every new JPEG or PNG you upload is converted automatically – in the background a few seconds after the upload (recommended), or immediately if you prefer the upload to wait. When WordPress regenerates thumbnails, the new sizes are converted too, and when you delete an image its AVIF and WebP copies are deleted with it.
How it helps
Editors and shop managers keep uploading images exactly as before, and every one of them is served in a next-gen format from the first visit. The plugin can also set WordPress’s large image threshold (2560 px by default), so huge camera photos get a sensibly sized copy for the site while the original file is kept.
How to set it up
- Go to Settings → New uploads.
- Keep Convert new uploads on In the background (recommended).
- Set the Large image threshold – 2560 px suits most themes; 0 keeps the WordPress default.
- Click Save Changes.
05Dashboard and activity log
What it is
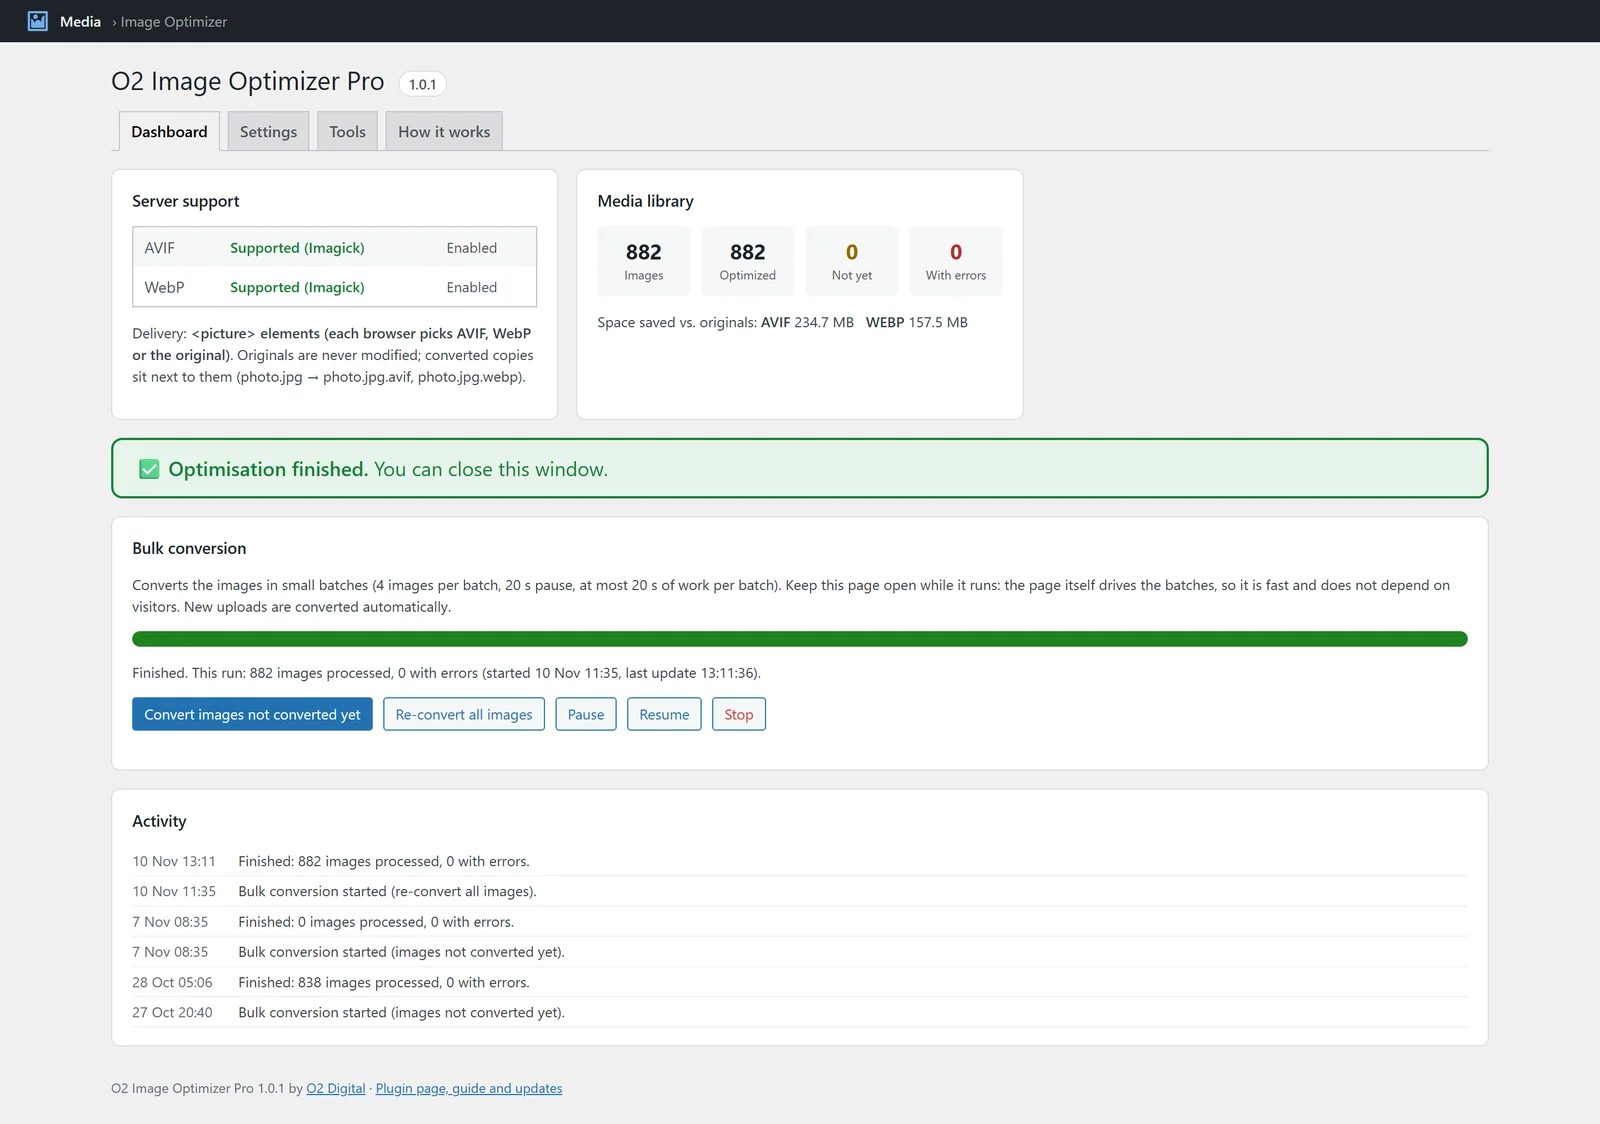
The Dashboard shows, at a glance, which formats your server can write and with which engine, how many images the library has, how many are optimized, not yet done or with errors, and how much space each format saves compared with the originals. An activity log records every bulk run, pause, resume and any image that could not be converted.
How it helps
You know immediately whether your hosting supports AVIF, how far the optimization has got and what it has achieved – in megabytes, not promises. The screenshot below is from a live WooCommerce store: 882 images, all optimized, 234.7 MB saved with AVIF.
06Status and savings for every image in the Media Library
What it is
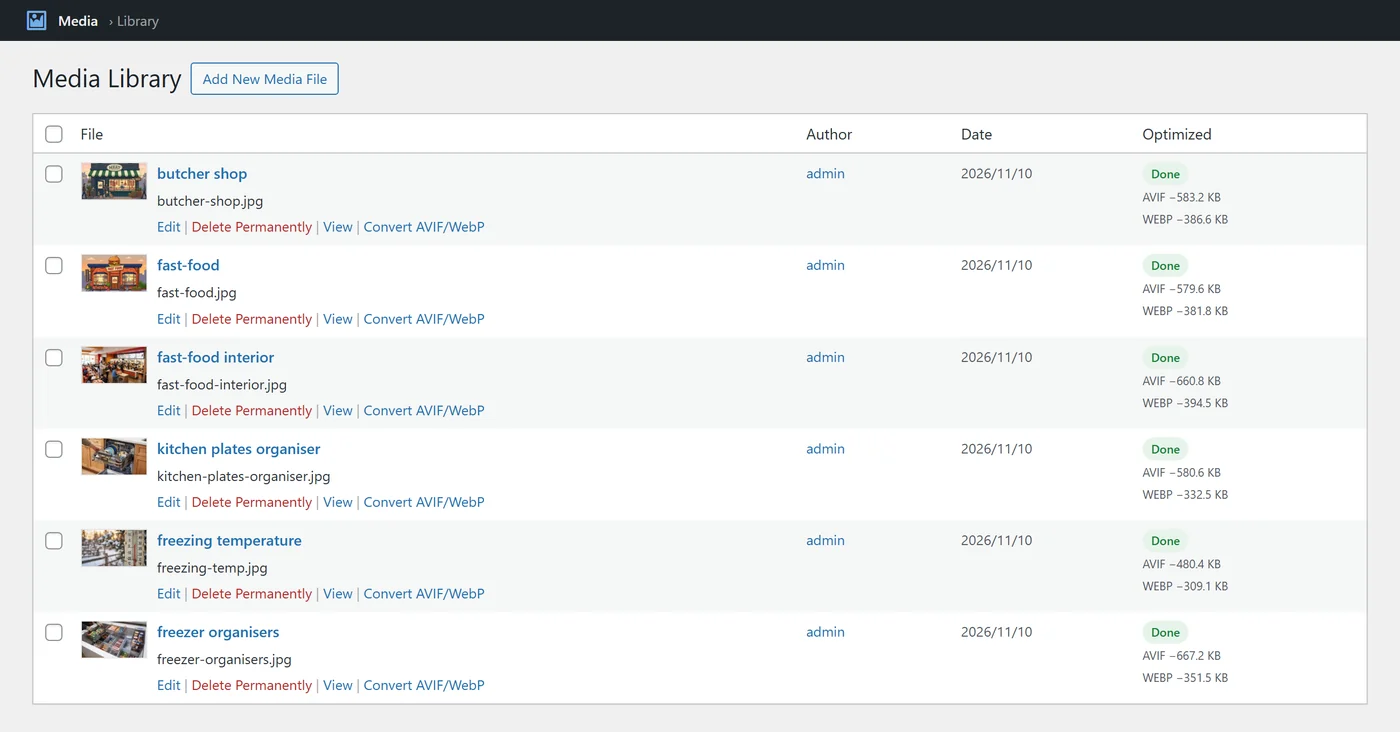
In Media → Library (list view) the plugin adds an Optimized column: a status badge for every image – Done, Not yet, Partial or Error – and the bytes saved in AVIF and WebP. Each image also gets a Convert AVIF/WebP row action to convert or re-convert it on the spot.
How it helps
You can check any single image without leaving the library, fix one that failed, or re-convert a photo after replacing it. Errors are shown with their reason, so you are never guessing.
How to use it
- Go to Media → Library and switch to the list view.
- Read the Optimized column for each image.
- Hover an image and click Convert AVIF/WebP to convert it now; the column updates without reloading.
07Tools: test one image, rewrite server rules, remove everything
What it is
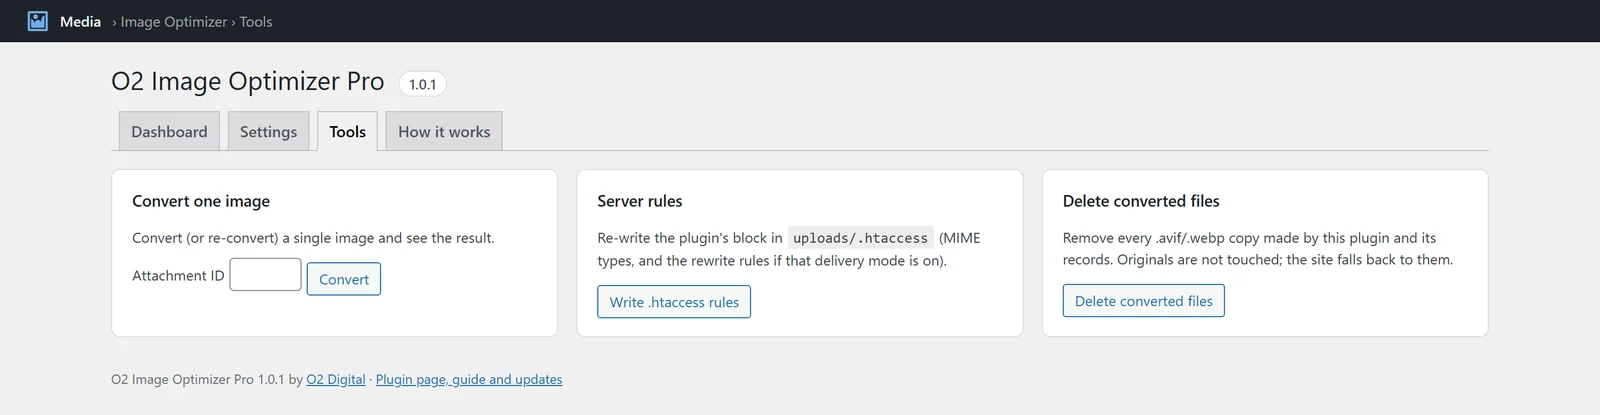
The Tools tab holds three actions you need occasionally: Convert one image by attachment ID and see a file-by-file report (each size, each format, before and after), Write .htaccess rules to refresh the plugin’s block in uploads/.htaccess, and Delete converted files to remove every AVIF and WebP copy the plugin made.
How it helps
You can test quality settings on one photo before converting thousands, and you can always go back: deleting the converted files leaves the site serving the originals, exactly as before. When you uninstall, settings and records are removed; the copies are removed too if you tick Delete converted files in Settings.
08WP-CLI commands for developers and agencies
What it is
Everything the dashboard does is also available from the command line, for servers where you prefer SSH, for very large libraries and for deployment scripts.
How it helps
Run the conversion without a browser window, without PHP web time limits, or as part of a site migration. Perfect for agencies managing many WordPress sites.
| Command | What it does |
|---|---|
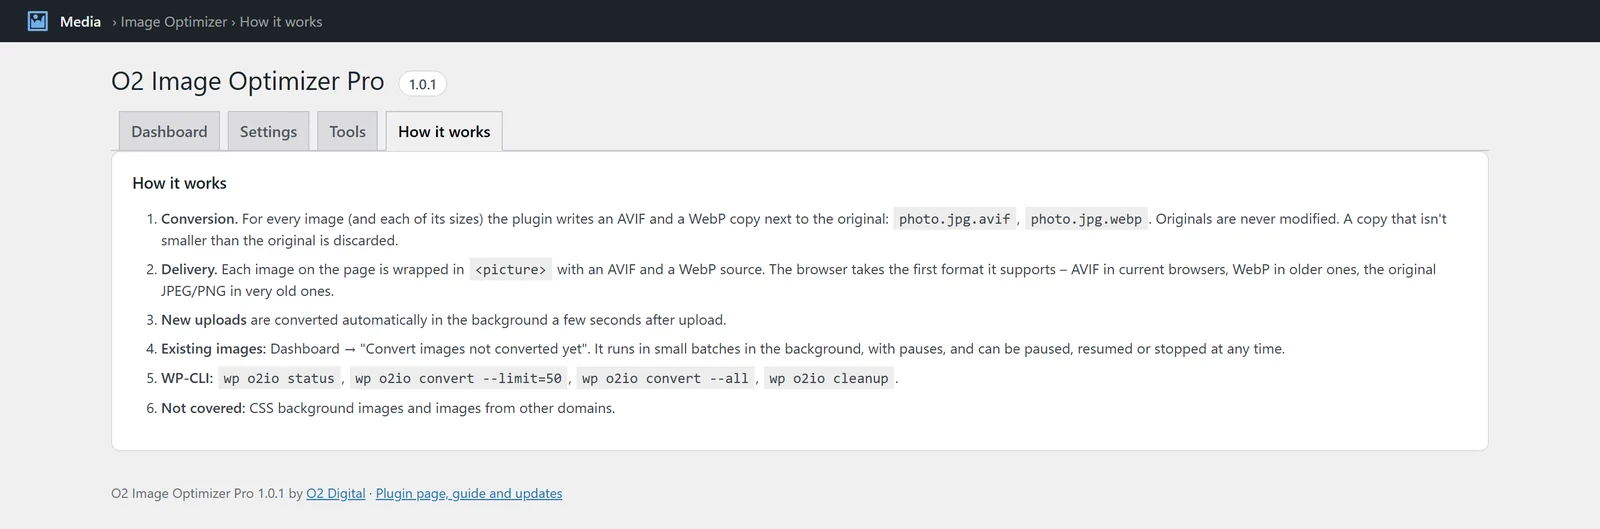
wp o2io status | Which formats the server supports and with which engine, library totals, space saved and the state of the background queue. |
wp o2io convert | Converts every image not converted yet, in the foreground. Add --limit=50 to do a part of the library. |
wp o2io convert --all | Re-creates the AVIF and WebP copies of every image, for example after changing the quality. |
wp o2io convert --id=123 | Converts a single attachment and prints the result. |
wp o2io cleanup --yes | Deletes every AVIF/WebP copy made by the plugin. Originals are not touched. |
09Compatibility and exclusions
What it is
The plugin is built to sit quietly under any theme and plugin stack. It leaves alone images already inside a <picture>, images in scripts, styles, templates and comments, images whose src is a placeholder filled in later by a script (mega menus, sliders), and – by default – images lazy-loaded through data-src attributes. Native loading="lazy" is kept as it is.
How it helps
You can exclude any image by CSS class (no-o2io or skip-webp out of the box) or by path – a folder like 2024/05/ or a file name like logo-. Admin screens, feeds, the REST API and the Customizer are never rewritten. It works with block themes and classic themes, Elementor and other page builders, WooCommerce, and caching plugins such as LiteSpeed Cache and WP Rocket.
Not covered: images set as CSS backgrounds in stylesheets, and images loaded from other domains. Everything in your own Media Library is.
Frequently asked questions
Is O2 Image Optimizer Pro really free?
Yes. The plugin is free to download and use on your websites, under the GPL licence. There is no subscription, no image limit, no API key and no account to create.
Does it change or replace my original images?
No. The original files are never modified. The plugin only adds .avif and .webp copies next to them (photo.jpg.avif, photo.jpg.webp). If you deactivate it, every page shows the originals again.
Are my images sent to an external service?
No. Conversion runs on your own server with the Imagick or GD library of PHP. Your images never leave your hosting, and there are no quotas or credits.
What is the difference between WebP and AVIF?
Both are modern image formats that are much smaller than JPEG and PNG at the same visual quality. WebP is typically 25–50% smaller and works in every current browser. AVIF is usually smaller still, often 50–75% smaller than JPEG, and works in current Chrome, Edge, Firefox and Safari 16.4+. The plugin creates both and lets each browser use the best one it supports.
What happens in browsers that do not support AVIF or WebP?
They receive the original JPEG or PNG. With the default picture-element delivery the browser itself chooses the first format it can display, so no visitor ever gets an image they cannot see.
Will it improve my PageSpeed and Core Web Vitals?
Smaller images load faster, which usually improves Largest Contentful Paint and removes the PageSpeed Insights recommendation to serve images in next-gen formats. The exact gain depends on how image-heavy your pages are and on your hosting.
Does it work with WooCommerce, page builders and my theme?
Yes. By default it optimizes every image on the page, including theme images, block content, page builders such as Elementor and WooCommerce product galleries. Responsive srcset and sizes are preserved.
Does it work with LiteSpeed Cache, WP Rocket or Cloudflare?
Yes. Picture-element delivery puts the choice in the HTML, so it is safe behind any page cache and any CDN. Empty your page cache once after activating so visitors get the new markup.
How long does the bulk conversion take?
It depends on the number of images and your server. Images are converted in small batches with pauses so shared hosting is not overloaded; on a typical shop, several hundred images take from tens of minutes to a couple of hours. Keep the dashboard open for the fastest run; if you close it, conversion continues in the background more slowly.
Does it convert images uploaded in the future?
Yes. New JPEG and PNG uploads are converted automatically in the background a few seconds after upload, or immediately if you choose that option. Regenerated thumbnails are converted too.
Can I exclude some images?
Yes. Add the class no-o2io or skip-webp to an image, or list your own classes and paths in Settings → Delivery. Images loaded by lazy-loading scripts through data-src attributes are left alone by default.
How do I remove the plugin completely?
Tools → Delete converted files removes every AVIF and WebP copy it made. With the Delete converted files setting on, deleting the plugin does the same; its settings, records and .htaccess rules are always removed on uninstall. Your originals are never touched.
What are the requirements?
WordPress 6.2 or newer and PHP 7.4 or newer, with the Imagick extension or GD compiled with WebP/AVIF support (GD can write AVIF from PHP 8.1). The plugin dashboard shows which formats your server supports.
Serve every image in its lightest format
Download O2 Image Optimizer Pro, activate it and run one bulk conversion. Every visitor then gets AVIF or WebP where their browser supports it, and your original images stay exactly as they were.
Download O2 Image Optimizer Pro 1.0.1Free WordPress plugin by O2 Digital · WordPress 6.2+ · PHP 7.4+ · Need help setting it up? Contact us